Showing posts with label crochet pattern. Show all posts

Sunday, October 23, 2016

Free Pattern: Crochet Dragon Fly Afghan

 
 As much as I love the summer months, I do enjoy the comfort of cooler weather.  I enjoy the delicious smells in my kitchen, sitting in front of a crackling fire and snuggling under a cozy blanket with my family.  It's also that time of year again, the time when I'm scouring through patterns and ideas looking for Christmas present opportunities! My mother is my biggest fan yet I'm ashamed to say I seldom crochet for my mom.  I'm not sure why, but aside from a quick scarf I hooked when I first started learning, I haven't thought to share one of my creations with her.  Being a lover of the dragonfly, when I saw this instructional video for the dragonfly stitch I knew it was perfect for a project for Mom!  This afghan not only worked up quickly, it's also easy for beginners!


https://www.youtube.com/watch?v=B8LyxJN4P54


Materials:

Yarn - (Mom has a romantic rose color theme in her bedroom)

Color A - Lion  Brand Pound of Love in Oxford Grey
Color B - Caron One Pound in Rose
Color C - Lion  Brand Pound of Love in Antique White
5.0 mm (H) Hook
Tapestry Needle for finishing


Abbreviations:

CH - Chain Stitch
SC- Single Crochet
DC - Double Crochet
SL - Slip Stitch
SK - Skip Stitch
TRC - Triple (Treble) Crochet

Instructions:

Afghan:

(Color A) - CH 157
Row 1 (Color A) - DC in 3rd CH from hook.  DC across, CH 2
Row 2 - DC Next 12 *CH 1, SK next st, DC next 12* Repeat between (*) across, CH 2 and turn
Row 3 - DC Next 8, *CH 3, SK next 3 st, SC in space left by CH 1 in previous row, CH 3, SK next 3 st, DC Next 8* Repeat between (*) across. CH 2 and turn
Row 4 - DC Next 7, *CH 4, SK next 4 st, SC in SC from previous row, CH 4, SK next 4 st, DC next 7* Repeat between (*) across. CH 2 and turn
Row 5 - DC Next 7, *DC in 4 CH from previous row, TRC in SC from previous row, DC in 4 CH from previous row, DC Next 7* Repeat between (*) across.  Ch 2 and turn
Row 6 - DC Across, Tie off and finish

Row 7 (Color C) - SC across


Row 8 (Color B) - DC in 3rd CH from hook.  DC across, CH 2
Row 9 - DC Next 12 *CH 1, SK next st, DC next 12* Repeat between (*) across, CH 2 and turn
Row 10 - DC Next 8, *CH 3, SK next 3 st, SC in space left by CH 1 in previous row, CH 3, SK next 3 st, DC Next 8* Repeat between (*) across. CH 2 and turn
Row 11 - DC Next 7, *CH 4, SK next 4 st, SC in SC from previous row, CH 4, SK next 4 st, DC next 7* Repeat between (*) across. CH 2 and turn
Row 12 - DC Next 7, *DC in 4 CH from previous row, TRC in SC from previous row, DC in 4 CH from previous row, DC Next 7* Repeat between (*) across.  CH 2 and turn
Row 13 - DC Across, CH 2 and turn
Row 14 - DC Next 12 *CH 1, SK next st, DC next 12* Repeat between (*) across, CH 2 and turn
Row 15 - DC Next 8, *CH 3, SK next 3 st, SC in space left by CH 1 in previous row, CH 3, SK next 3 st, DC Next 8* Repeat between (*) across. CH 2 and turn
Row 16 - DC Next 7, *CH 4, SK next 4 st, SC in SC from previous row, CH 4, SK next 4 st, DC next 7* Repeat between (*) across. CH 2 and turn
Row 17 - DC Next 7, *DC in 4 CH from previous row, TRC in SC from previous row, DC in 4 CH from previous row, DC Next 7* Repeat between (*) across.  CH 2 and turn
Row 18 - DC Across

Row 19 (Color A) - SC across


Repeat pattern (Row 1 - 19) and color scheme until desired length completed.  I repeated 5 times and finished with a repeat of Rows 1-6.  This gave my afghan a consistent start and finish with a single row of dragonflies. 


Edging:

Round 1 - (Color A) Single Crochet around perimeter of afghan
Round 2 - (Color C) I started at the SC before a corner - SC, CH 2, SK 1 around.  In Corners SC, CH 2, SC in each corner ST. 

If you'd like a finished product please visit my Etsy store: 
https://www.etsy.com/listing/490954307/dragonfly-afghan
https://www.etsy.com

Thursday, March 3, 2016

Free Pattern: Ladies Classic Newsboy Hat

My younger sister sends me pics of crochet requests almost weekly. Often times she does not include a pattern or comments, only multiple pics of something she'd like to add to her collection of free yarn art courtesy of moi. This classic Newsboy hat was her latest request. I found a few different styles and patterns but, of course, I had to make it my own. Enjoy! 


Materials:
  • 4.25 mm (G) Hook 
  • Yarn 
    • Whatever color you prefer for hat (I used Red Heart Super Saver) 
  • Button for accent
  • Tapestry Needle for tucking ends

Abbreviations:
CH - Chain Stitch
SC - Single Crochet
DC - Double Crochet

HDC - Half Double Crochet
SL - Slip Stitch
FPDC - Front Post Double Crochet
BPDC - Back Post Double Crochet


Instructions:

Hat: 

Round 1:  Ch 3, 10 DC in the 1st Ch stitch, sl stitch into beginning ch, ch 2 
Round 2: 2 DC in each stitch, sl into beginning ch, ch 2
Round 3: * 2 DC, 1 DC in next* Repeat between (*) until final stitch, sl stitch into beginning ch, ch 2 
Round 4: *1 DC first 2 st, 2DC in next* Reoeat between ( * ) until final st, SL st into beginning ch, ch 2 
Round 5: *1 DC first 3 st, 2DC in next* Repeat  between ( * ) until final st, SL st into beginning ch, ch 2 
Round 6: *1 DC first 4 st, 2DC in next* Repeat  between ( * ) until final st, SL st into beginning ch, ch 2 
Round 7: *FPDC first st, BPDC next 2 st* Repeat between ( * ) around, SL st into beginning ch, CH 2 
Round 8 - 17: Repeat Round 7 

(Note: Your CH 2 at the end of each round/beginning of next round will fall into the seam of your 1st FPDC of the round) 

Brim: 

Row 1: SL st in first 13 st, SC in next 2,  HDC in next 20, SC in next 2, Ch 1 and turn 
Row 2: SC in first 2 st, HDC in next 20 st, SC next 2 
Row 3: Repeat Row 2, Tie off and finish

Strap: 

Row 1: Ch 28, HDC in 3rd Ch from hook, HDC in each st across, Ch 2 and turn
Row 2: HDC each st across, CH 2 and turn
Row 3: Repeat Row 2. Tie off and finish.

Sew strap on hat over brim by stitching at each end.  Sew on a cute button if you like!  


Monday, January 25, 2016

Free Pattern: Extra Wide Boho Scrap Scarf


I am always looking for ways to use up my yarn scraps and I love mixing colors and stitches. This pattern satisfied both of those things for me and the finished product is my new favorite 'everyday' scarf! 

Materials:

•Yarn -  The beautiful thing about this scarf is that anything goes! I used scraps for the entire piece. I don't think I even used the same yarn twice, which is one of my favorite things about the finished product. 
•5.0 mm (H) Hook
•Tapestry Needle for tucking ends
Abbreviations:
Ch - Chain Stitch
SC - Single Crochet
DC - Double Crochet
TR - Treble/Triple Crochet
SL - Slip Stitch

Sk St - Skip Stitch

Instructions:

Note: I used a different color yarn for each row therefore I simply tied off each row and started the next row with a new color. 

Ch 177
Row 1: SC 2nd CH from hook and across 
Row 2: CH 2, DC each 
Row 3: CH 3, sk st, DC, *CH 1, sk st, DC* repeat between (*) across
Row 4: CH 3, DC next 2, *Ch 1, sk st, DC next 3* repeat 
Row 5: CH 1, SC across 
Row 6: CH 3, sk 2, *2 DC on next st, CH 2* repeat between (*) across 
Row 7: CH 3, 3 DC between 2 DC in prev row creating "V" repeat across to final st. DC in last st. 
Row 8: CH 5, sk 2, DC, *ch 2 sk next 2 st, DC* repeat between (*) across to last st. DC last st 
Row 9: Ch 1, sk ch sts, *5 DC in space between DC from prev row (under ch sts), sk next group of ch, SL st in next DC st* repeat between (*) across to final st. DC in last st
Row 10: Ch 1, SC next 2, DC in sl st from prev row, *SC next 5, DC* repeat between (*) across to final st. DC last st
Row 11: CH 3, DC across
Row 12: CH 3, sk 1, *DC, CH 1, DC on next st, sk next st* repeat between (*) across. 
Row 13: Ch 1 starting at 3rd ch from prev row. SC back loop only across 
Row 14: CH 4, TR across 
Row 15: CH 3, DC next 2, *Ch 1, sk st, DC next 3* repeat between (*) across
Row 16: CH 2, SC across. 

Fringe - (All colors) Cut strands of each yarn approximately 4 - 6 inches in length. Hold 3 mixed yarns together and pull middle of loose strands through a loop in the bottom row in a slip knot. (I added fringe at the beginning of every row) Viola! Your very own uniquely funky extra-wide boho scarf! Enjoy! 


Monday, January 11, 2016

Project: Temperature Afghan


I don't know about you, but my New Year has been very busy! After a 2 week stay-cation through the holidays I'm trying to transition back to a normal routine and I'm having a difficult time getting into a groove.
Week 1 of my stay-cation was full of Christmas prep, holiday guests and travel. While exhausting, it was a week full of love and laughter as my family enjoyed our first Christmas with my new granddaughter.

She reminded us all of the true meaning of the holidays as she was more excited about the lights and attention than any gift she received. (She was my favorite gift this year!)

Week 2 of my stay-cation was a week of relaxation and reflection. Michael's had a ridiculous sale on yarn and I thought I had stocked up for winter but, with a week off work I'm finding that I'm near empty on my yarn stash already. I am not ashamed to admit that I stayed in my pjs most of the week and enjoyed the view... 


I am not a fan of winter (not even a little bit) and when temps dip below 80 degrees I begin my annual hibernation. Thankfully the hubs keeps my fireplace roaring and he's supportive of my yarn addiction. He even helped with my new storage crates in my 'office' last week. 

But alas, all good things must come to an end. Last week was back to reality for me and I've returned to the land of responsibility. In my time off I whipped 2 afghans and various hats and boot cuffs. If you're like me, when I start a project I can't rest until it is done. I'm an instant gratification gal and an unfinished project is the stuff bad dreams are made of!! Eek!! Now, with limited free time I'm looking for a project that will keep me entertained while not consuming my thoughts while at work. 

Several of my fellow hookers have introduced me to the Temperature Afghan concept. Crochet Crowd reviews a bit of history and some suggestions for your very own Temperature Afghan in the link below: 


I've started mine for this year and I'm really excited about this project! What a great gift idea for next Christmas!! It only requires a couple of minutes each day and the end result will be not only a beautiful peice, but a bit of recorded history. The creative liberties are endless here! 

The temperature gauge I've created for my afghan:


So far my afghan has lots of Jade and Teal... Boo!! (Why don't I live in a warmer climate!?!) I'm hoping my finished product will have no Orchid and lots of Tangerine and Cherry rows! 


As you can see, I've decided on the Easy Ripple Afghan pattern for my design. Handcrafting with Love shared an easy to follow pattern if you'd like to give it a spin - easy for beginners! 


We had a dusting of snow yesterday and I've toyed with the idea of adding a SC white-cap to those days (rows) that see snow. Maybe a blue or gray SC cap for rainy days? Hm... Endless possibilities!! 

When summer returns I will be elbow deep in dirt in my garden in my spare time. I'm excited that I can easily continue this quick project with a couple of minutes each day. Until then, my yarn-addiction continues and I will supplement with scarves, hats and boot cuffs. 

If you make a temp afghan of your own please share! I'm excited to compare the variations! 

Enjoy! 

Update: I did it! I added a row of white SC for the snow we saw yesterday! I love the little accent and it will be fun to see how many snow-capped rows I end up with (seriously hoping there's not many) at the end of the year. I think I'm going to add a SC of gray for the rainy days.  To be continued... 


Friday, December 11, 2015

Free Pattern: Crochet Boston Terrier Hat

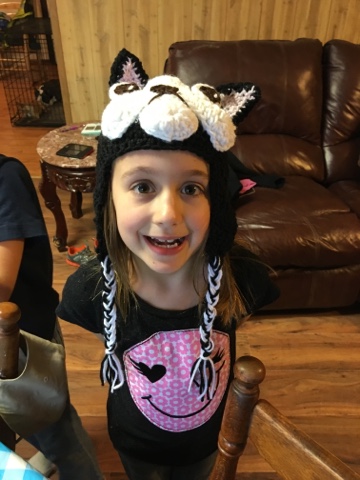
My 6 yr old niece lost her Boston Terrier, Dixie, a few weeks ago and she has been heartbroken since losing her girl.  She requested a Boston hat for Christmas but I couldn't find any free patterns so I worked up this sweet little hat for her.  I hope she enjoys it as much as I enjoyed making it for her!  This Boston hat has a lot of pieces but she's simple to work up, even for a beginner.  Enjoy!

Crochet Boston Terrier Hat
Materials -
  • 4.25 mm (G) Hook
  • Yarn 
    • White
    • Black
    • Brown
  • Tapestry Needle for finishing
  • Poly-fill Stuffing
Abbreviations -

CH - Chain Stitch
SC - Single Crochet

DC - Double Crochet
HDC - Half Double Crochet
SL - Slip Stitch
DC2TOG - Double Crochet 2 Together (decrease
)
SC2TOG - Single Crochet 2 Together (decrease)


Instructions:

Hat: 

Round 1: (black) Ch 3, 10 HDC in the 1st Ch stitch, sl stitch into beginning ch, ch 2 (10)
Round 2: 2 HDC in each stitch, sl into beginning ch, ch 2 (20)
Round 3: * 2 HDC, 1 HDC in next* Repeat between (*) until final stitch, sl stitch into beginning ch, ch 2 (30)

Round 4: *1 HDC 2 st, 2 HDC in next* Repeat between (*) until final stitch, sl stitch into beginning ch, ch 2 (40)
Round 5: *1 HDC 3st, 2 HDC in next* Repeat between (*) until final stitch, sl stitch into beginning ch, ch 2 (50)
Round 6: 1 HDC each, sl stitch into beginning ch, ch2 (50)
Round 7- 15: Repeat Round 6.  Finish round 15, tie off and tuck ends.

Ear Flaps:

Row 1: (black)  Start new row in any stitch from round 10.  SC 12 stitches, ch 2, turn (12)
Row 2: 1 DC each (12)
Row 3: DC 2 TOG, DC next 8 stitches, DC 2 TOG, ch 2, turn (10)
Row 4: DC 2 TOG, DC next 6 stitches, DC 2 TOG, ch 2, turn (8)
Row 5:  DC 2 TOG, DC next 4 stitches, DC 2 TOG, ch 2 turn (6) 
Row 6: DC 2 TOG, DC next 2 stitches, DC 2 TOG, ch 2 turn (4) 
ROw 7: DC 2 TOG twice,

Count 14 stitches across the front of the hat, start new row for 2nd ear flap.
Row 1: SC 9 stitches, ch 2, turn (9)
Row 2: DC 2 TOG, DC next 5 stitches, DC 2 TOG, ch 2, turn (7)
Row 3: DC 2 TOG, DC next 2 stitches, DC 2 TOG, ch 2, turn (4)
Row 4: DC 2 TOG twice, tie off and finish

Cut 9-12 strands of black and white yarn (8-10" each) and pull through bottom of each earflap.  Braid and tie off. 

Cheeks:

Row 1: (white) Ch 17, 6 DC (all in same stitch) 2nd st from hook, 1 DC, HDC next 2, SC next 8, HDC next 2, DC, 6 DC last st, working around ch - DC, HDC next 2, SC next 8, HDC next 2, DC, Sl into starting ch
Row 2: Ch 2, DC next 2, 2 DC, 2 DC, DC next 2, HDC next 2, SC 8, HDC next 2, DC next 2, 2 DC, 2DC, DC next 2, HDC next 2, Sl. Tie off 
Row 3: Find middle stitch on top row and count 3 to the right. (5th loop from the top of the right cheek) Sl into 5th loop and SC in same st. SC next 5, ch 1 and turn
Row 4: SC across, ch 1 and turn (6) 
Row 5 and 6: Repeat Row 4 
Row 7: SC 2 TOG, SC next 2, SC2TOG, ch 1 and turn
Row 8: SC2TOG twice tie off 
Leave tail long enough to stitch on to hat

Chin:

Round 1: (white) Ch 2, 10 SC in the 2nd st from hook, sl stitch into beginning ch, ch 1 (10)
Round 2: 2 DC in 1st 6 stitches, 1 DC in next 4, sl into beginning ch (16) Tie off

Nose 

Row 1: (brown) Ch 5, SC 2nd st from hook and across (4)
Row 2: Sc across, ch 1 turn (4) 
Row 3: Sc 2 tog twice (2)
Row 4: Sc 2 tog (1)
Tie off 
Sew onto cheeks (middle)


Ears (make 2) 

Row 1: (pink) Ch 7, SC in 2nd ch from hook, 6 SC, ch 1 turn
Row 2: SC each, 6 
Row 3: Repeat row 2 
Row 4: SC2TOG, SC next 2, SC2TOG
Row 5: SC each, 4
Row 6: SC2TOG twice 
Row 7: SC each (2) 
Row 8: SC2TOG tie off 
Row 9: (black) SC around your triangle 

Repeat Rows 1-9 in all black for back of ears. Sew front and back together and tie off.  Leave tail long enough to stitch on to hat.

Eyes 

Round 1: (white) Ch 3, 10 DC in the 2nd stitch from the hook, sl stitch into beginning st, tie off


Round 1: (brown) Ch 2, 10 SC in the 1st st from hook, sl stitch into beginning st, tie off

Sew brown circle to middle of white circle.  Note:
I added a stitch of white for accent 


Putting it all together!  - Sew chin onto hat before cheeks. The full part of the circle (2 DC st) should be on bottom for a pouty chin. Leave about 1/2 inch from bottom of hat.  I tucked a little poly-fill under the chin to make it pout.  Stitch cheeks over top of chin piece. 


If you're looking for a finished product please visit my Etsy store:

https://www.etsy.com/listing/490988725/crochet-boston-terrier-hat
https://www.etsy.com


Sunday, November 15, 2015

Free Crochet Pattern - Snuggly Snowman


This snuggly snowman adds nostalgia to any Christmas décor and he's the perfect snuggle buddy for the little ones in your life.  This little guy is a fun addition to your Christmas gift list for anyone on your list. 


Materials:
Yarn
  • White
  • Orange
  • Choice color for scarf/hat. (I used "I love this wool" in color #400/Bravo for the snowman pictured here) 
5.0 mm (H) Hook
Tapestry Needle
Poly-fill
Stitch Marker

Abbreviations:
Ch - Chain Stitch
SC - Single Crochet
DC - Double Crochet
SC2TOG - Double Crochet 2 Together (decrease)
SL - Slip Stitch


Instructions:

Body

Round 1: (white yarn) Ch 3, 10 SC in the 1st Ch stitch, SL stitch into beginning ch, ch 1 (10)
Round 2: 2 SC in each stitch, SL into beginning ch, ch 1 (20)
Round 3: * 2 SC, 1 SC in next* Repeat between (*) until final stitch, sl stitch into beginning ch to join, ch 1 (30)

Round 4: *1 SC in 2 st, 2 SC in next st* Repeat between (*) until final st, sl st into beginning ch to join, ch 1 (40)
Round 5 - 9: 1 SC in each st, sl st into beginning ch to join, ch1 (40)

Round 10: 1 SC in first 14 st, *2 SC in next st, 1 SC* Repeat between (*) 6 times, 1 SC in final 16 st , sl st into beginning ch to join, ch 1 (48) - This increase will give your snowman a chubby belly!
Round 11 - 20: 1 SC in each st in the round, sl st into beginning ch to join, ch 1 (48)
Round 21: 1 SC in first 13 st, *SC 2 TOG, 1 SC* Repeat between (*) 6 times, 1 SC in final 15 st, sl st into beginning ch to join, ch 1 (40)
Round 22: 1 SC in each st in the round, sl st into beginning ch to join, ch 1 (40)
Round 23: *1 SC in first 2 st, SC 2 TOG* repeat between (*) until final st., sl st into beginning ch to join, ch 1 (30)

If you like, you can stuff your snowman body now while before we finish up. 
 
Round 24: *1 SC in first st, SC 2 TOG* repeat between (*) until final st, sl st into beginning ch to join, ch 1 - (20)
Round 25: *1 SC in first st, SC 2 TOG* repeat between (*) until final st, sl st into beginning ch to join, ch 1 - (10)

Finish and tie off. 

Head

Round 1: (white yarn) Ch 3, 10 SC in the 1st Ch stitch, SL stitch into beginning ch, ch 1 (10)
Round 2: 2 SC in each stitch, SL into beginning ch, ch 1 (20)
Round 3: * 2 SC, 1 SC in next* Repeat between (*) until final stitch, sl stitch into beginning ch to join, ch 1 (30)

Round 4: *1 SC in 2 st, 2 SC in next st* Repeat between (*) until final st, sl st into beginning ch to join, ch 1 (40)
Round 5 - 14: 1 SC in each st, sl st into beginning ch to join, ch1 (40)
Round 15: *1 SC in first 2 st, SC 2 TOG* repeat between (*) until final st., sl st into beginning ch to join, ch 1 (30)
Round 16: 1 SC in each, sl st into beginning ch to join, ch 1 (30)
Round 17: *1 SC in first st, SC 2 TOG* repeat between (*) until final st, sl st into beginning ch to join, ch 1 - (20)
Round 18: 1 SC in each, sl st into beginning ch to join, ch 1 (20)
Round 19: *1 SC in first st, SC 2 TOG* repeat between (*) until final st, sl st into beginning ch to join, ch 1 - (10)
Finish and Tie off, leaving tail long enough to sew head on body. I did not stuff my snowman's head until his face was sewn on. 
 
Nose
 
Round 1: (orange yarn) Ch 3, 6 SC in the 1st Ch stitch, SL stitch into beginning ch, ch 1 (6) 
Round 2- 8: 1Sc in each (6) - you will be working in a round so don't forget your stitch marker
Round 9: 1 SC, 2 TOG, 1 SC, 2 TOG 
Round 10: 2 tog tie off, finish 

Sew on nose, and eyes/mouth of your choice.  I used buttons for eyes and a simple yarn mouth.  Be creative and make your snowman your own! Once you have your face the way you like it, stuff his head and sew your snowman's head onto his body. 

Scarf
 
Row 1: Ch 9, 1 DC in 3rd st from hook, dc 6, ch 2 turn
Row 2- 30: Dc 7, ch 2, turn 
Tie off and finish
Add fringe on both ends if preferred

Hat

Round 1: (white yarn) Ch 3, 10 DC in the 1st Ch stitch, SL stitch into beginning ch, ch 1 (10)
Round 2: 2 DC in each stitch, SL into beginning ch, ch 1 (20)
Round 3: * 2 DC, 1 DC in next* Repeat between (*) until final stitch, sl stitch into beginning ch to join, ch 1 (30)

Round 4: *1 DC in 2 st, 2 DC in next st* Repeat between (*) until final st, sl st into beginning ch to join, ch 1 (40)
Round 5 - 6: 1 DC in each st, sl st into beginning ch to join, ch 1
Round 7: 1 SC in each, front loop only, sl st into beginning ch to join
Round 8 - 12: 1 SC in each, sl st into beginning ch to join.
 
Hint: I secured my hat with a single stitch so it doesn't fall off when my grandkids are snuggling my snowman.  You may chose to leave it unsecure so you can easily switch out his hat and/or scarf. 


Ta - da!  You've finished your snuggly snowman!  I hope he brings as much fun to your holidays as mine has!  Enjoy!