Friday, December 11, 2015

Free Pattern: Crochet Boston Terrier Hat

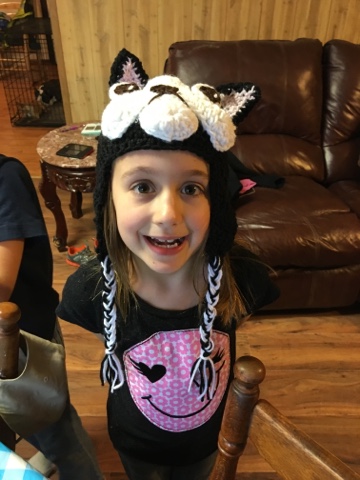
My 6 yr old niece lost her Boston Terrier, Dixie, a few weeks ago and she has been heartbroken since losing her girl.  She requested a Boston hat for Christmas but I couldn't find any free patterns so I worked up this sweet little hat for her.  I hope she enjoys it as much as I enjoyed making it for her!  This Boston hat has a lot of pieces but she's simple to work up, even for a beginner.  Enjoy!

Crochet Boston Terrier Hat
Materials -
  • 4.25 mm (G) Hook
  • Yarn 
    • White
    • Black
    • Brown
  • Tapestry Needle for finishing
  • Poly-fill Stuffing
Abbreviations -

CH - Chain Stitch
SC - Single Crochet

DC - Double Crochet
HDC - Half Double Crochet
SL - Slip Stitch
DC2TOG - Double Crochet 2 Together (decrease
)
SC2TOG - Single Crochet 2 Together (decrease)


Instructions:

Hat: 

Round 1: (black) Ch 3, 10 HDC in the 1st Ch stitch, sl stitch into beginning ch, ch 2 (10)
Round 2: 2 HDC in each stitch, sl into beginning ch, ch 2 (20)
Round 3: * 2 HDC, 1 HDC in next* Repeat between (*) until final stitch, sl stitch into beginning ch, ch 2 (30)

Round 4: *1 HDC 2 st, 2 HDC in next* Repeat between (*) until final stitch, sl stitch into beginning ch, ch 2 (40)
Round 5: *1 HDC 3st, 2 HDC in next* Repeat between (*) until final stitch, sl stitch into beginning ch, ch 2 (50)
Round 6: 1 HDC each, sl stitch into beginning ch, ch2 (50)
Round 7- 15: Repeat Round 6.  Finish round 15, tie off and tuck ends.

Ear Flaps:

Row 1: (black)  Start new row in any stitch from round 10.  SC 12 stitches, ch 2, turn (12)
Row 2: 1 DC each (12)
Row 3: DC 2 TOG, DC next 8 stitches, DC 2 TOG, ch 2, turn (10)
Row 4: DC 2 TOG, DC next 6 stitches, DC 2 TOG, ch 2, turn (8)
Row 5:  DC 2 TOG, DC next 4 stitches, DC 2 TOG, ch 2 turn (6) 
Row 6: DC 2 TOG, DC next 2 stitches, DC 2 TOG, ch 2 turn (4) 
ROw 7: DC 2 TOG twice,

Count 14 stitches across the front of the hat, start new row for 2nd ear flap.
Row 1: SC 9 stitches, ch 2, turn (9)
Row 2: DC 2 TOG, DC next 5 stitches, DC 2 TOG, ch 2, turn (7)
Row 3: DC 2 TOG, DC next 2 stitches, DC 2 TOG, ch 2, turn (4)
Row 4: DC 2 TOG twice, tie off and finish

Cut 9-12 strands of black and white yarn (8-10" each) and pull through bottom of each earflap.  Braid and tie off. 

Cheeks:

Row 1: (white) Ch 17, 6 DC (all in same stitch) 2nd st from hook, 1 DC, HDC next 2, SC next 8, HDC next 2, DC, 6 DC last st, working around ch - DC, HDC next 2, SC next 8, HDC next 2, DC, Sl into starting ch
Row 2: Ch 2, DC next 2, 2 DC, 2 DC, DC next 2, HDC next 2, SC 8, HDC next 2, DC next 2, 2 DC, 2DC, DC next 2, HDC next 2, Sl. Tie off 
Row 3: Find middle stitch on top row and count 3 to the right. (5th loop from the top of the right cheek) Sl into 5th loop and SC in same st. SC next 5, ch 1 and turn
Row 4: SC across, ch 1 and turn (6) 
Row 5 and 6: Repeat Row 4 
Row 7: SC 2 TOG, SC next 2, SC2TOG, ch 1 and turn
Row 8: SC2TOG twice tie off 
Leave tail long enough to stitch on to hat

Chin:

Round 1: (white) Ch 2, 10 SC in the 2nd st from hook, sl stitch into beginning ch, ch 1 (10)
Round 2: 2 DC in 1st 6 stitches, 1 DC in next 4, sl into beginning ch (16) Tie off

Nose 

Row 1: (brown) Ch 5, SC 2nd st from hook and across (4)
Row 2: Sc across, ch 1 turn (4) 
Row 3: Sc 2 tog twice (2)
Row 4: Sc 2 tog (1)
Tie off 
Sew onto cheeks (middle)


Ears (make 2) 

Row 1: (pink) Ch 7, SC in 2nd ch from hook, 6 SC, ch 1 turn
Row 2: SC each, 6 
Row 3: Repeat row 2 
Row 4: SC2TOG, SC next 2, SC2TOG
Row 5: SC each, 4
Row 6: SC2TOG twice 
Row 7: SC each (2) 
Row 8: SC2TOG tie off 
Row 9: (black) SC around your triangle 

Repeat Rows 1-9 in all black for back of ears. Sew front and back together and tie off.  Leave tail long enough to stitch on to hat.

Eyes 

Round 1: (white) Ch 3, 10 DC in the 2nd stitch from the hook, sl stitch into beginning st, tie off


Round 1: (brown) Ch 2, 10 SC in the 1st st from hook, sl stitch into beginning st, tie off

Sew brown circle to middle of white circle.  Note:
I added a stitch of white for accent 


Putting it all together!  - Sew chin onto hat before cheeks. The full part of the circle (2 DC st) should be on bottom for a pouty chin. Leave about 1/2 inch from bottom of hat.  I tucked a little poly-fill under the chin to make it pout.  Stitch cheeks over top of chin piece. 


If you're looking for a finished product please visit my Etsy store:

https://www.etsy.com/listing/490988725/crochet-boston-terrier-hat
https://www.etsy.com


Friday, December 4, 2015

Free Crochet Pattern: Boho Baby Afghan (V- Stitch)


Baby K approved!
This funky little afghan is a must-have accessory for the Boho Baby Girl in your life!  With a faux tie-dye pattern and daisy accents your little lady will be cozy and stylish!  My 3 month old granddaughter is just discovering her hands and the daisies double as entertainment for her grabbing hands!
 
Materials:
  • 5.5 mm (I) Hook 
  • Yarn - I used Red Heart with Love Punch for the body of the afghan.  It worked up in a fun tie-dye look!
  • Tapestry Needle for finishing
Abbreviations:
Ch - Chain Stitch
SC - Single Crochet
DC - Double Crochet
TRC - Triple Crochet
SL - Slip Stitch

Instructions: 

Afghan -

Row 1: Ch 73
Row 2: 1 SC in 2nd ch from hook. 1-SC each ch across, ch 1 (72)
Row 3: SC in the 'V' of the 1st SC in Row 1, (this will create the split SC or 'V' st). Repeat in each SC across (72) 
Row 4 - Row 96: Repeat row 3


Border -
 
I used a complimentary color from my scrap stash for the first round of my afghan border. If you choose to do an alternative color, you will want to cut and tie off ar the end of row 96. If you want to continue with your afghan color, simply continue. 

Round 1: *SC (through top loops as normal) across (Row 97) In final/corner st- SC 1, Ch 2, SC 1* - Repeat (*) around. Finish and tie off. 

Daisy Edging -

  • Daisy
Round 2: Using yellow yarn or preferred color for the center of your daisy. Ch 3, 8 DC in 1st ch (2 from hook) finish and tie off - (8)
Round 3: Change to white or your preferred petal color. Join in any DC loop and Ch 2, *TRC, Ch 1, TRC, Ch 2, Sl St, Ch 2* all in first St. Repeat (*) in each St around (8) Tie off and finish 

I used 24 Daisies for my afghan - 12 on each end. You may chose to use daisies on all 4 sides of your afghan edging, if so simply double your number of daisies. 

  • Edging: 
Starting in corner stitch 1 SC first 3 St, *Ch 1, SL St in Ch (between 2 DC) of daisy petal, Ch 1, SC in next St, SC in next 2* Repeat (*) across to corner st, SC, Ch 1, SC. 

- If you chose to add daisies to all 4 sides of afghan continue around to starting corner st. In starting corner 1 SC, CH 1, SL into first ST of the round. 
 
- If you are only using daisies on 2 ends like my afghan, SC each down length of afghan and repeat daisy attachment on bottom, then SC back up remaining sideIn starting corner 1 SC, CH 1, SL into first ST of the round. 


Ignore the ends that still need to be tucked.  My least favorite part!


Sunday, November 22, 2015

Free Crochet Pattern: Shell Hat with Heart

This little hat is sweet and simple even for the newest beginner. This is one of my favorite hats to whip up quickly before Baby K and I enjoy some outdoor fun or a Girl's Day on the town. Every fashionista needs a fun, stylish hat - no matter her age! 
Note: The pattern below is for infant 3-6 mos. - to increase size you will add increase rounds (After Row 4) in multiples of 5. 2 increase rounds should give you an adult size hat. Add Shell stitch rows until desired length has been achieved. 
 
Materials:
  • 4.25 mm (G) Hook 
  • Yarn 
    • Whatever color you prefer for hat 
    • Heart color 
  • Tapestry Needle for finishing
Abbreviations:
CH - Chain Stitch
SC - Single Crochet
DC - Double Crochet

HDC - Half Double Crochet
SL - Slip Stitch


Instructions:

Hat: 

Round 1:  Ch 3, 10 DC in the 1st Ch stitch, sl stitch into beginning ch, ch 2 (10)
Round 2: 2 DC in each stitch, sl into beginning ch, ch 2 (20)
Round 3: * 2 DC, 1 DC in next* Repeat between (*) until final stitch, sl stitch into beginning ch, ch 2 (30)
Round 4: *Sk 2 st, 5 DC in next st, Sk 2 st, SC in next st* this is your first shell stitch. Repeat (*) around, sl stitch into beginning ch 
Round 5: To line up your shells in this (and future) rounds, you will want to: Sk to middle DC of first shell stitch. 5 DC in center stitch (3rd DC) of 1st shell. Sk 2 st, SC in SC from row 4, *Sk 2 st, 5 DC, Sk 2 st, SC in next st*. Repeat (*) around, sl stitch into beginning ch. 
Round 6 - 10: Repeat round 5.  Tie off and finish. 

Heart

I used this simple Crochet Heart Appliqué pattern I found on "Skip to my Lou" at http://www.skiptomylou.org/crochet-heart-applique/. It's simple and an adorable embellishment for any project you can think of! 
(There are tons of other free patterns to browse so make sure to look around when you're done with your shell hat! )

Sunday, November 15, 2015

Free Crochet Pattern - Snuggly Snowman


This snuggly snowman adds nostalgia to any Christmas décor and he's the perfect snuggle buddy for the little ones in your life.  This little guy is a fun addition to your Christmas gift list for anyone on your list. 


Materials:
Yarn
  • White
  • Orange
  • Choice color for scarf/hat. (I used "I love this wool" in color #400/Bravo for the snowman pictured here) 
5.0 mm (H) Hook
Tapestry Needle
Poly-fill
Stitch Marker

Abbreviations:
Ch - Chain Stitch
SC - Single Crochet
DC - Double Crochet
SC2TOG - Double Crochet 2 Together (decrease)
SL - Slip Stitch


Instructions:

Body

Round 1: (white yarn) Ch 3, 10 SC in the 1st Ch stitch, SL stitch into beginning ch, ch 1 (10)
Round 2: 2 SC in each stitch, SL into beginning ch, ch 1 (20)
Round 3: * 2 SC, 1 SC in next* Repeat between (*) until final stitch, sl stitch into beginning ch to join, ch 1 (30)

Round 4: *1 SC in 2 st, 2 SC in next st* Repeat between (*) until final st, sl st into beginning ch to join, ch 1 (40)
Round 5 - 9: 1 SC in each st, sl st into beginning ch to join, ch1 (40)

Round 10: 1 SC in first 14 st, *2 SC in next st, 1 SC* Repeat between (*) 6 times, 1 SC in final 16 st , sl st into beginning ch to join, ch 1 (48) - This increase will give your snowman a chubby belly!
Round 11 - 20: 1 SC in each st in the round, sl st into beginning ch to join, ch 1 (48)
Round 21: 1 SC in first 13 st, *SC 2 TOG, 1 SC* Repeat between (*) 6 times, 1 SC in final 15 st, sl st into beginning ch to join, ch 1 (40)
Round 22: 1 SC in each st in the round, sl st into beginning ch to join, ch 1 (40)
Round 23: *1 SC in first 2 st, SC 2 TOG* repeat between (*) until final st., sl st into beginning ch to join, ch 1 (30)

If you like, you can stuff your snowman body now while before we finish up. 
 
Round 24: *1 SC in first st, SC 2 TOG* repeat between (*) until final st, sl st into beginning ch to join, ch 1 - (20)
Round 25: *1 SC in first st, SC 2 TOG* repeat between (*) until final st, sl st into beginning ch to join, ch 1 - (10)

Finish and tie off. 

Head

Round 1: (white yarn) Ch 3, 10 SC in the 1st Ch stitch, SL stitch into beginning ch, ch 1 (10)
Round 2: 2 SC in each stitch, SL into beginning ch, ch 1 (20)
Round 3: * 2 SC, 1 SC in next* Repeat between (*) until final stitch, sl stitch into beginning ch to join, ch 1 (30)

Round 4: *1 SC in 2 st, 2 SC in next st* Repeat between (*) until final st, sl st into beginning ch to join, ch 1 (40)
Round 5 - 14: 1 SC in each st, sl st into beginning ch to join, ch1 (40)
Round 15: *1 SC in first 2 st, SC 2 TOG* repeat between (*) until final st., sl st into beginning ch to join, ch 1 (30)
Round 16: 1 SC in each, sl st into beginning ch to join, ch 1 (30)
Round 17: *1 SC in first st, SC 2 TOG* repeat between (*) until final st, sl st into beginning ch to join, ch 1 - (20)
Round 18: 1 SC in each, sl st into beginning ch to join, ch 1 (20)
Round 19: *1 SC in first st, SC 2 TOG* repeat between (*) until final st, sl st into beginning ch to join, ch 1 - (10)
Finish and Tie off, leaving tail long enough to sew head on body. I did not stuff my snowman's head until his face was sewn on. 
 
Nose
 
Round 1: (orange yarn) Ch 3, 6 SC in the 1st Ch stitch, SL stitch into beginning ch, ch 1 (6) 
Round 2- 8: 1Sc in each (6) - you will be working in a round so don't forget your stitch marker
Round 9: 1 SC, 2 TOG, 1 SC, 2 TOG 
Round 10: 2 tog tie off, finish 

Sew on nose, and eyes/mouth of your choice.  I used buttons for eyes and a simple yarn mouth.  Be creative and make your snowman your own! Once you have your face the way you like it, stuff his head and sew your snowman's head onto his body. 

Scarf
 
Row 1: Ch 9, 1 DC in 3rd st from hook, dc 6, ch 2 turn
Row 2- 30: Dc 7, ch 2, turn 
Tie off and finish
Add fringe on both ends if preferred

Hat

Round 1: (white yarn) Ch 3, 10 DC in the 1st Ch stitch, SL stitch into beginning ch, ch 1 (10)
Round 2: 2 DC in each stitch, SL into beginning ch, ch 1 (20)
Round 3: * 2 DC, 1 DC in next* Repeat between (*) until final stitch, sl stitch into beginning ch to join, ch 1 (30)

Round 4: *1 DC in 2 st, 2 DC in next st* Repeat between (*) until final st, sl st into beginning ch to join, ch 1 (40)
Round 5 - 6: 1 DC in each st, sl st into beginning ch to join, ch 1
Round 7: 1 SC in each, front loop only, sl st into beginning ch to join
Round 8 - 12: 1 SC in each, sl st into beginning ch to join.
 
Hint: I secured my hat with a single stitch so it doesn't fall off when my grandkids are snuggling my snowman.  You may chose to leave it unsecure so you can easily switch out his hat and/or scarf. 


Ta - da!  You've finished your snuggly snowman!  I hope he brings as much fun to your holidays as mine has!  Enjoy!

Saturday, November 14, 2015

Free Crochet Pattern - Boot Cuffs in Shell Stitch


These are so quick and easy to make, I sometimes whip out a pair to match my outfit for the day.  I hope you enjoy making and wearing them as much as I have!


Materials-
Yarn
Hook (G) 4.25 mm

Abbreviations -
CH - Chain
SL - Slip Stitch
DC - Double Crochet

Instructions-
Row 1: Ch 34,  5 DC (shell st) in 3rd ch from hook, sk 2 st SC in next st, sk 2 st, *5 DC in next st, sk 2 st, SC in next st* repeat between (*) 3 more times.  In last st, DC 3 times then ch 1, turn.


Row 2: 5 DC in 2nd st from hook, (in SC st in previous row), sk 2 st SC in next st (at top of cluster st in previous row), sk 2 st, *5 DC in next st, sk 2 st, SC in next st, sk 2 st* repeat between (*) 3 more times.  In last st, DC 3 times then ch 1, turn
Row 3-10: Repeat row 2


Finish - Fold cuff in half and sl stitch the length of the cuff sewing the two open ends together forming the cuff.  Tie off and finish. 


Ta-da!  You've finished your 1 hour shell stitch boot cuffs!  I have made several of these in various colors and I wear them all winter! They also make great stocking stuffers or last minute gifts for the ladies in your life! Enjoy!

Thursday, November 12, 2015

Free Crochet Pattern: Whimiscal Owl


Materials:
4.25 mm (G) hook
Yarn - Owl Body 4 Colors (I used the following)
  • Lavender
  • Pink
  • Yellow
  • Turquoise
Yarn - Eyes and Beak
  • Orange
  • White

Abbreviations:
HDC - Half Double Crochet
Sl Stitch - Slip Stitch
CH - Chain
SC - Single Crochet

Owl Front

Row 1: (Color A) CH 3, 10 SC in 1st CH st, SL st starting st, CH 2 (10)
Row 2: 2 HDC each stitch (20)
Row 3: (Color B) Connect the next color and ch 2, *2 HDC in next st, 1 HDC in next st* Repeat between (*) until row is complete, SL st starting st, finish and tie off (30)
Row 4: (Color C) Connect the next color and ch 2, *1 HDC in next 2 sts, 1 HDC in next st* Repeat between (*) until row is complete, SL st starting st, finish and tie off (40)
Row 5: (Color D) Connect the next color and ch 2, *1 HDC in next 3 sts, 1 HDC in next st* Repeat between (*) until row is complete, SL st starting st, finish and tie off (60)
Row 6: SC next 10 st, ch 2, turn
Row 7: 1 DC, 1 HDC, 1 SC each next 6 st, 1 HDC, 1 DC, Ch 2 and turn
Row 8: 1 HDC, 1 SC each next 8 st, 1 HDC, finish and tie off


Owl Back

Row 1:  (Color D) CH 3, 10 SC in 1st CH st, SL st starting st, CH 2 (10)
Row 2: 2 HDC each stitch (20)
Row 3:  Connect the next color and ch 2, *2 HDC in next st, 1 HDC in next st* Repeat between (*) until row is complete, SL st starting st, finish and tie off (30)
Row 4:  Connect the next color and ch 2, *1 HDC in next 2 sts, 1 HDC in next st* Repeat between (*) until row is complete, SL st starting st, finish and tie off (40)
Row 5: Connect the next color and ch 2, *1 HDC in next 3 sts, 1 HDC in next st* Repeat between (*) until row is complete, SL st starting st, finish and tie off (60)
Row 6: SC next 10 st, ch 2, turn
Row 7: 1 DC, 1 HDC, 1 SC each next 6 st, 1 HDC, 1 DC, Ch 2 and turn
Row 8: 1 HDC, 1 SC each next 8 st, 1 HDC, finish and tie off leaving yarn long enough to sew your owl together


Eyes

Row 1: Ch 3, SC 10 times in farthest ch from hook.  Sl st into starting ch. Tie off and finish leaving enough tail to sew onto owl.

Repeat for 2nd eye.

Beak

Row 1: Ch 3, SC in 2nd st from hook, DC in last ch st.  Tie off and finish leaving enough tail to sew beak onto owl.


Finishing

Sew eyes and beak on to front of owl.  Attach buttons of your choice for eyes.  Stitch around owl, sewing the front to the back.  Stop at head and stuff owl with Poly-Fill until desired cuddle has been achieved.  Finish sewing owl together, tie off and finish.  Cut (4) 3-4" pieces of yarn to tie into sides of owl's head.


Ta-da!  You've finished your whimsical owl! I have a ton of these lying around the house because I just can't seem to stop making them!  They are so cute and simple!  These little guys make fun little last minute gifts, especially for those "just because" occasions.  That is, if you can bear to let them go! Enjoy! 
Whimsical Owl


Free Crochet Pattern: Baby Snowman Beanie

This simple snowman beanie for baby is not only quick and easy to put together, it's just plain adorable!  Hopefully soon my granddaughter will model it for us!  I will be sure to update!

Materials:
  • 4.25 mm (G) Hook
  • Yarn
    • White
    • Red
    • Black
    • Orange
  • Tapestry Needle for finishing
  • Stuffing
  • Black Buttons
Abbreviations:
CH - Chain Stitch
SC - Single Crochet
DC - Double Crochet
SL - Slip Stitch
DC2TOG - Double Crochet 2 Together (decrease)


Instructions:

Hat:

Round 1: (white yarn) Ch 3, 10 DC in the 1st Ch stitch, sl stitch into beginning ch, ch 2 (10)
Round 2: 2 DC in each stitch, sl into beginning ch, ch 2 (20)
Round 3: * 2 DC, 1 DC in next* Repeat between (*) until final stitch, sl stitch into beginning ch, ch 2 (30)

Round 4: *1 DC 2 st, 2 DC in next* Repeat between (*) until final stitch, sl stitch into beginning ch, ch 2 (40)
Round 5: 1 DC each, sl stitch into beginning ch, ch2 (40)
Round 6 - 10: Repeat Round 5.  Finish round 10, tie off and tuck ends.
 
Ear Flaps: 

Row 1: (white yarn)  Start new row in any stitch from round 10.  SC 9 stitches, ch 2, turn (9)
Row 2: DC 2 TOG, DC next 5 stitches, DC 2 TOG, ch 2, turn (7)
Row 3: DC 2 TOG, DC next 2 stitches, DC 2 TOG, ch 2, turn (4)
Row 4: DC 2 TOG twice, tie off and finish

Count 14 stitches across the front of the hat, start new row for 2nd ear flap.
Row 1: SC 9 stitches, ch 2, turn (9)
Row 2: DC 2 TOG, DC next 5 stitches, DC 2 TOG, ch 2, turn (7)
Row 3: DC 2 TOG, DC next 2 stitches, DC 2 TOG, ch 2, turn (4)
Row 4: DC 2 TOG twice, tie off and finish

Cut 9-12 strands of red and white yarn (8-10" each) and pull through bottom of each earflap.  Braid and tie off. 

Nose:

Row 1: Ch 10
Row 2: DC in 3rd ch from hook, DC next 2 st, HDC next 3 st, SC next 2 st, sl st in last st and tie off.  Leave your yarn long to sew nose on to your snowman

Cut red, black and white yarn to make Pom Pom for the top of the hat and tie on.  If you're not sure how to make pom poms, I found a great tutorial here:

http://www.danamadeit.com/2010/12/pom-poms-a-very-simple-tutorial.html

Grab a few buttons and sew on to make your face however you like.  Ta-da!  You've just completed your infant snowman beanie! Enjoy!


Baby Snowman Beanie