 |
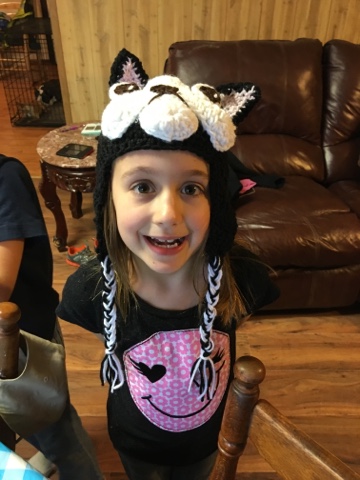
| Crochet Boston Terrier Hat |
- 4.25 mm (G) Hook
- Yarn
- White
- Black
- Brown
- Tapestry Needle for finishing
- Poly-fill Stuffing
CH - Chain Stitch
SC - Single Crochet
DC - Double Crochet
HDC - Half Double Crochet
SL - Slip Stitch
DC2TOG - Double Crochet 2 Together (decrease)
SC2TOG - Single Crochet 2 Together (decrease)
Instructions:
Hat:
Round 1: (black) Ch 3, 10 HDC in the 1st Ch stitch, sl stitch into beginning ch, ch 2 (10)
Round 2: 2 HDC in each stitch, sl into beginning ch, ch 2 (20)
Round 3: * 2 HDC, 1 HDC in next* Repeat between (*) until final stitch, sl stitch into beginning ch, ch 2 (30)
Round 4: *1 HDC 2 st, 2 HDC in next* Repeat between (*) until final stitch, sl stitch into beginning ch, ch 2 (40)
Round 5: *1 HDC 3st, 2 HDC in next* Repeat between (*) until final stitch, sl stitch into beginning ch, ch 2 (50)
Round 6: 1 HDC each, sl stitch into beginning ch, ch2 (50)
Round 7- 15: Repeat Round 6. Finish round 15, tie off and tuck ends.
Round 7- 15: Repeat Round 6. Finish round 15, tie off and tuck ends.
Ear Flaps:
Row 2: 1 DC each (12)
Row 3: DC 2 TOG, DC next 8 stitches, DC 2 TOG, ch 2, turn (10)
Row 4: DC 2 TOG, DC next 6 stitches, DC 2 TOG, ch 2, turn (8)
Row 5: DC 2 TOG, DC next 4 stitches, DC 2 TOG, ch 2 turn (6)
Row 3: DC 2 TOG, DC next 8 stitches, DC 2 TOG, ch 2, turn (10)
Row 4: DC 2 TOG, DC next 6 stitches, DC 2 TOG, ch 2, turn (8)
Row 5: DC 2 TOG, DC next 4 stitches, DC 2 TOG, ch 2 turn (6)
Row 6: DC 2 TOG, DC next 2 stitches, DC 2 TOG, ch 2 turn (4)
ROw 7: DC 2 TOG twice,
Count 14 stitches across the front of the hat, start new row for 2nd ear flap.
Row 1: SC 9 stitches, ch 2, turn (9)
Row 2: DC 2 TOG, DC next 5 stitches, DC 2 TOG, ch 2, turn (7)
Row 3: DC 2 TOG, DC next 2 stitches, DC 2 TOG, ch 2, turn (4)
Row 4: DC 2 TOG twice, tie off and finish
Cut 9-12 strands of black and white yarn (8-10" each) and pull through bottom of each earflap. Braid and tie off.
Cheeks:
Row 1: (white) Ch 17, 6 DC (all in same stitch) 2nd st from hook, 1 DC, HDC next 2, SC next 8, HDC next 2, DC, 6 DC last st, working around ch - DC, HDC next 2, SC next 8, HDC next 2, DC, Sl into starting ch
Row 2: Ch 2, DC next 2, 2 DC, 2 DC, DC next 2, HDC next 2, SC 8, HDC next 2, DC next 2, 2 DC, 2DC, DC next 2, HDC next 2, Sl. Tie off
Row 3: Find middle stitch on top row and count 3 to the right. (5th loop from the top of the right cheek) Sl into 5th loop and SC in same st. SC next 5, ch 1 and turn

Row 5 and 6: Repeat Row 4
Row 7: SC 2 TOG, SC next 2, SC2TOG, ch 1 and turn
Row 8: SC2TOG twice tie off
Leave tail long enough to stitch on to hat

Chin:
Round 1: (white) Ch 2, 10 SC in the 2nd st from hook, sl stitch into beginning ch, ch 1 (10)
Round 2: 2 DC in 1st 6 stitches, 1 DC in next 4, sl into beginning ch (16) Tie off
Nose
Row 1: (brown) Ch 5, SC 2nd st from hook and across (4)
Row 2: Sc across, ch 1 turn (4)
Row 3: Sc 2 tog twice (2)
Row 3: Sc 2 tog twice (2)
Row 4: Sc 2 tog (1)
Tie off
Sew onto cheeks (middle)

Ears (make 2)
Row 1: (pink) Ch 7, SC in 2nd ch from hook, 6 SC, ch 1 turn
Row 2: SC each, 6
Row 3: Repeat row 2
Row 4: SC2TOG, SC next 2, SC2TOG
Row 5: SC each, 4
Row 6: SC2TOG twice
Row 7: SC each (2)
Row 8: SC2TOG tie off
Row 9: (black) SC around your triangle
Repeat Rows 1-9 in all black for back of ears. Sew front and back together and tie off. Leave tail long enough to stitch on to hat.
Eyes
Round 1: (white) Ch 3, 10 DC in the 2nd stitch from the hook, sl stitch into beginning st, tie off

Round 1: (brown) Ch 2, 10 SC in the 1st st from hook, sl stitch into beginning st, tie off
Sew brown circle to middle of white circle. Note: I added a stitch of white for accent
Round 1: (white) Ch 3, 10 DC in the 2nd stitch from the hook, sl stitch into beginning st, tie off

Round 1: (brown) Ch 2, 10 SC in the 1st st from hook, sl stitch into beginning st, tie off
Sew brown circle to middle of white circle. Note: I added a stitch of white for accent
Putting it all together! - Sew chin onto hat before cheeks. The full part of the circle (2 DC st) should be on bottom for a pouty chin. Leave about 1/2 inch from bottom of hat. I tucked a little poly-fill under the chin to make it pout. Stitch cheeks over top of chin piece.

If you're looking for a finished product please visit my Etsy store:
https://www.etsy.com/listing/490988725/crochet-boston-terrier-hat
https://www.etsy.com
No comments:
Post a Comment